Using Tinyproxy for Mobile Development on macOS
A common problem encountered with web development where private or local development sites with no public DNS sites are being used is the one of viewing these locally running development sites on an iPhone or iPad for testing purposes. This becomes even more of a problem when working on a mobile theme or particularly a responsive design where it’s kind of important to test simultaneously on multiple screen sizes while your implementing the breakpoints required for the content to adapt to the different displays.
For the last few weeks I’ve been working on a large scale responsive project with a team of other awesome Classy Llama’s. So this got me to thinking, and the result was: eureka, I’ll run a proxy server!
There are many proxy servers out there which would likely do just as good a job at accomplishing the same goals. I chose Tinyproxy because it’s a very lightweight proxy daemon built specifically for POSIX operating systems, meaning it will run seamlessly on the OS X development machines we primarily use, but can also be readily used on Linux if needed. It’s fast and very lean on resource utilization. It’s also freely distributed under the GNU GPL v2 license, so the cost certainly fits the bill here as well.
If you need a proxy with more advanced features, you may find Charles Proxy will serve you better. If I ever give it a go, I may come back with another blog post, but for now I’ve not tried it. One thing it has is traffic limiting to simulate network conditions, but my iOS devices have that ability built-in.
I use the Homebrew package manager to install the majority of my CLI tools which I use on a daily basis. Fortunately, there is a pre-existing package for installing Tinyproxy with Homebrew. So it’s a snap to setup! Here is how…
Run the one line install command. Your output may vary slightly.
$ brew install tinyproxy

==> Downloading https://www.banu.com/pub/tinyproxy/1.8/tinyproxy-1.8.3.tar.bz2
Already downloaded: /Library/Caches/Homebrew/tinyproxy-1.8.3.tar.bz2
==> Downloading patches
######################################################################## 100.0%
==> Patching
patching file configure
Hunk #1 succeeded at 6744 (offset -1 lines).
==> ./configure --prefix=/usr/local/Cellar/tinyproxy/1.8.3 --disable-regexcheck
==> make install
/usr/local/Cellar/tinyproxy/1.8.3: 14 files, 244K, built in 44 seconds
Next, for this to be useful to you, you’ll need to allow other devices on your network access to your proxy server. I’ve added localhost and the local class C subnet to my allow list, but it’s possible to specify hostnames of connecting devices as well. It’s hardly very secure if you’re running on a public network, so keep this in mind if you frequently work from Starbucks.
$ cd /usr/local/Cellar/tinyproxy/1.8.3/
$ perl -i.bak -pe 's/^Allow 127.0.0.1$/Allow 127.0.0.1\nAllow localhost\nAllow 192.168.1.1\/24/' ./etc/tinyproxy.conf
The one thing the brew package missed was creating two directories which tinyproxy needs to run. Launch it in non-daemon mode and it will tell you what these are, allowing you to create them.
$ tinyproxy -d
tinyproxy: Could not create file /usr/local/Cellar/tinyproxy/1.8.3/var/log/tinyproxy/tinyproxy.log: No such file or directory
tinyproxy: Could not create file /usr/local/Cellar/tinyproxy/1.8.3/var/run/tinyproxy/tinyproxy.pid: No such file or directory
tinyproxy: Could not create PID file.

$ mkdir -p ./var/log/tinyproxy/ ./var/run/tinyproxy/
And finally, launch your proxy in the background like so. It’ll spawn a few threads to handle incoming connections and start working immediately.
$ tinyproxy
Ok, so the proxy is up and running, but how can we use it? Not to worry, you’re almost there! The last thing you need to do is configure your iOS device’s proxy settings so it will route all http traffic through the proxy.
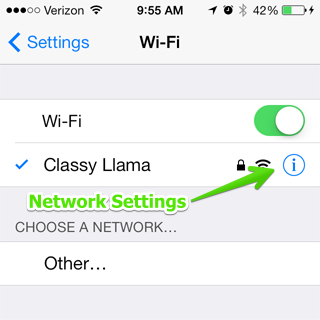
- Launch the Settings app and open the WiFi section.

- Click the information button to edit the advanced settings.
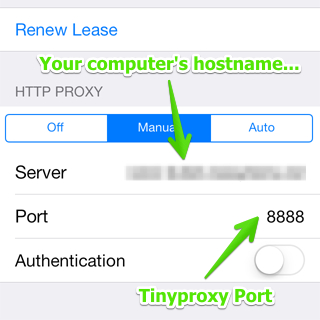
- Set the hostname or private IP address of the machine running the proxy and port number under HTTP Proxy -> Manual, all the way at the bottom of the screen.